
stm32 development environment on linux
1 .为什么不是 gcc
在开发 stm32 的时候,编译工具链要使用 gcc-arm-none-eabi,为什么不是 gcc 呢?这就要说到 linux 下的交叉编译了,因为我们要在 PC 机上编译出可以运行在 ARM 上的程序,使用 gcc 编译出的是在 PC 上运行的程序,所以我们要使用 gcc-arm-none-eabi 进行交叉编译~
配置方法:
1.linux vscode
1. vscode 下载插件 cmake, cmake-tools, cortex-Debug
保守起见, sudo apt install cmake
2. 安装 OpenOCD, 用于烧录
ctrl+alt+t 打开终端
sudo apt install libtool-bin
sudo apt install openocd
sudo apt-get install libhidapi-dev
3. 安装 gcc-arm-none-eabi 编译器
不建议 sudo apt-get gcc-arm-none-eabi, 可能网比较慢
建议从官网下载
https://developer.arm.com/downloads/-/gnu-rm
1 | tar -jxvf gcc-arm-none-eabi-10.3-2021.10-x86_64-linux.tar.bz2 |
下载完成用 mv 移动到/opt, 然后用终端输入
sudo gedit /opt/profile
在文件最后添加
export PATH=$PATH:/opt/你的文件名/bin
ctrl+s 退出 ,输入 source .bashrc,
最后 reboot
最后是工程配置
在 CubeMX 中生成文件要勾选生成 Makefiles 文件
打开 VScode
打开工程
ctrl+shift+p , Edit Configurrations (JSON)
根据 Makefile 中的配置
去掉-D, 配置到 c_cpp_properties. json
1 | "defines": [ |
烧录
openocd -f interface/cmsis-dap.cfg -f target/stm32f4x.cfg
telnet localhost 4444
program /home/lps/stm32/test01/build/test01.hex
reset
exit
launch.json
要修改配置文件
1 | { |
task.json
1 | { |
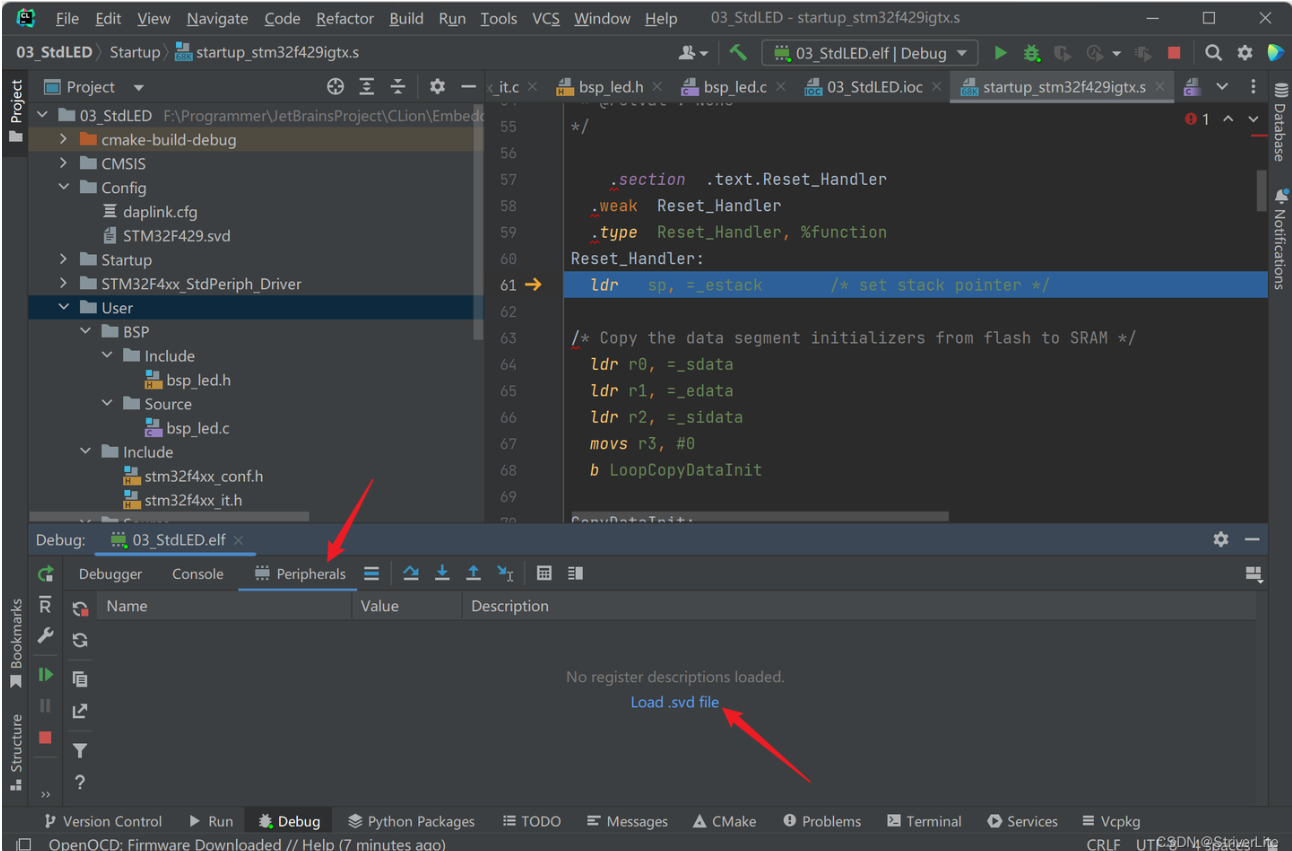
svd 文件能在调试的时候方便看到各个外设的状态,在之前 Windows 下 MDK 和 EWARM 安装目录里都可以找到
`输入make愉快编译了,然后就开始error…
make: No rule to make target build', needed bydefault’. Stop.
linux clioN
cubeIDE 工程
配置
修改项目 CmakeLists_template. txt 模板
1 | #默认是include_directories(${includes}) |
1 | include_directories(${includes} |
1 | file(GLOB_RECURSE SOURCES ${sources} |
gcc 环境中 printf 和 scanf 的配置,需要重新实现 C 标准库中缺少的实现
1 | //redirect _read to huart1,necessary for scanf、getchar |
烧录调试
在根目录新建 cmsisi-dap. cfg
1 | \#source [find interface/stlink.cfg] 如果是stlink选这个 |
警告
记得在 cmakelist_temoleate. txt 修改,不要在 cmakelist. txt 修改,cubemx 会覆盖
1 | # project settings |
while (1) 死循环警告
取消勾选 endess loop statements
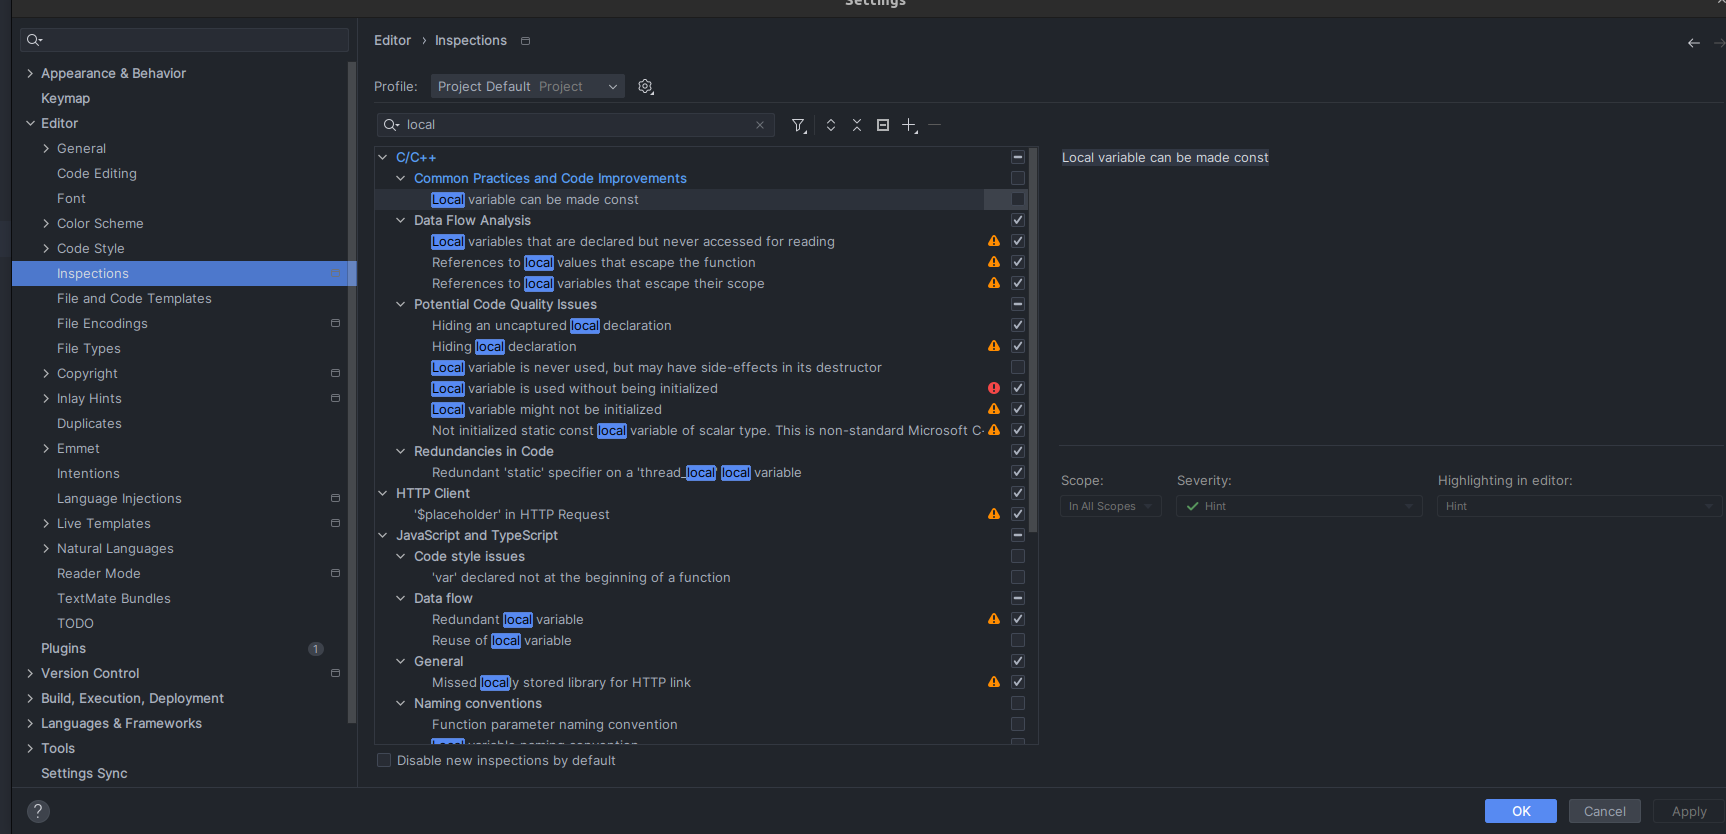
局部变量没有 const 警告
取消勾选 Local variable can be made const
redefined 啥的
GCC 编译选项 屏蔽某些警告 CMAKE_CXX_FLAGS
报错
non constant or forward reference address expression for section .ARM.extab
non constant or forward reference address expression for section .ARM. extab 错误解决 - 老司机快发车 - 博客园
the file was loaded in a wrong encoding
cmake + ninja + openod
特点
无需 ide,直接在终端编译,建议搭配 nvim 使用,也可以在 clion 、vscode 中使用, 使用 cmake 而不是 makefile 可以更加高效
生成
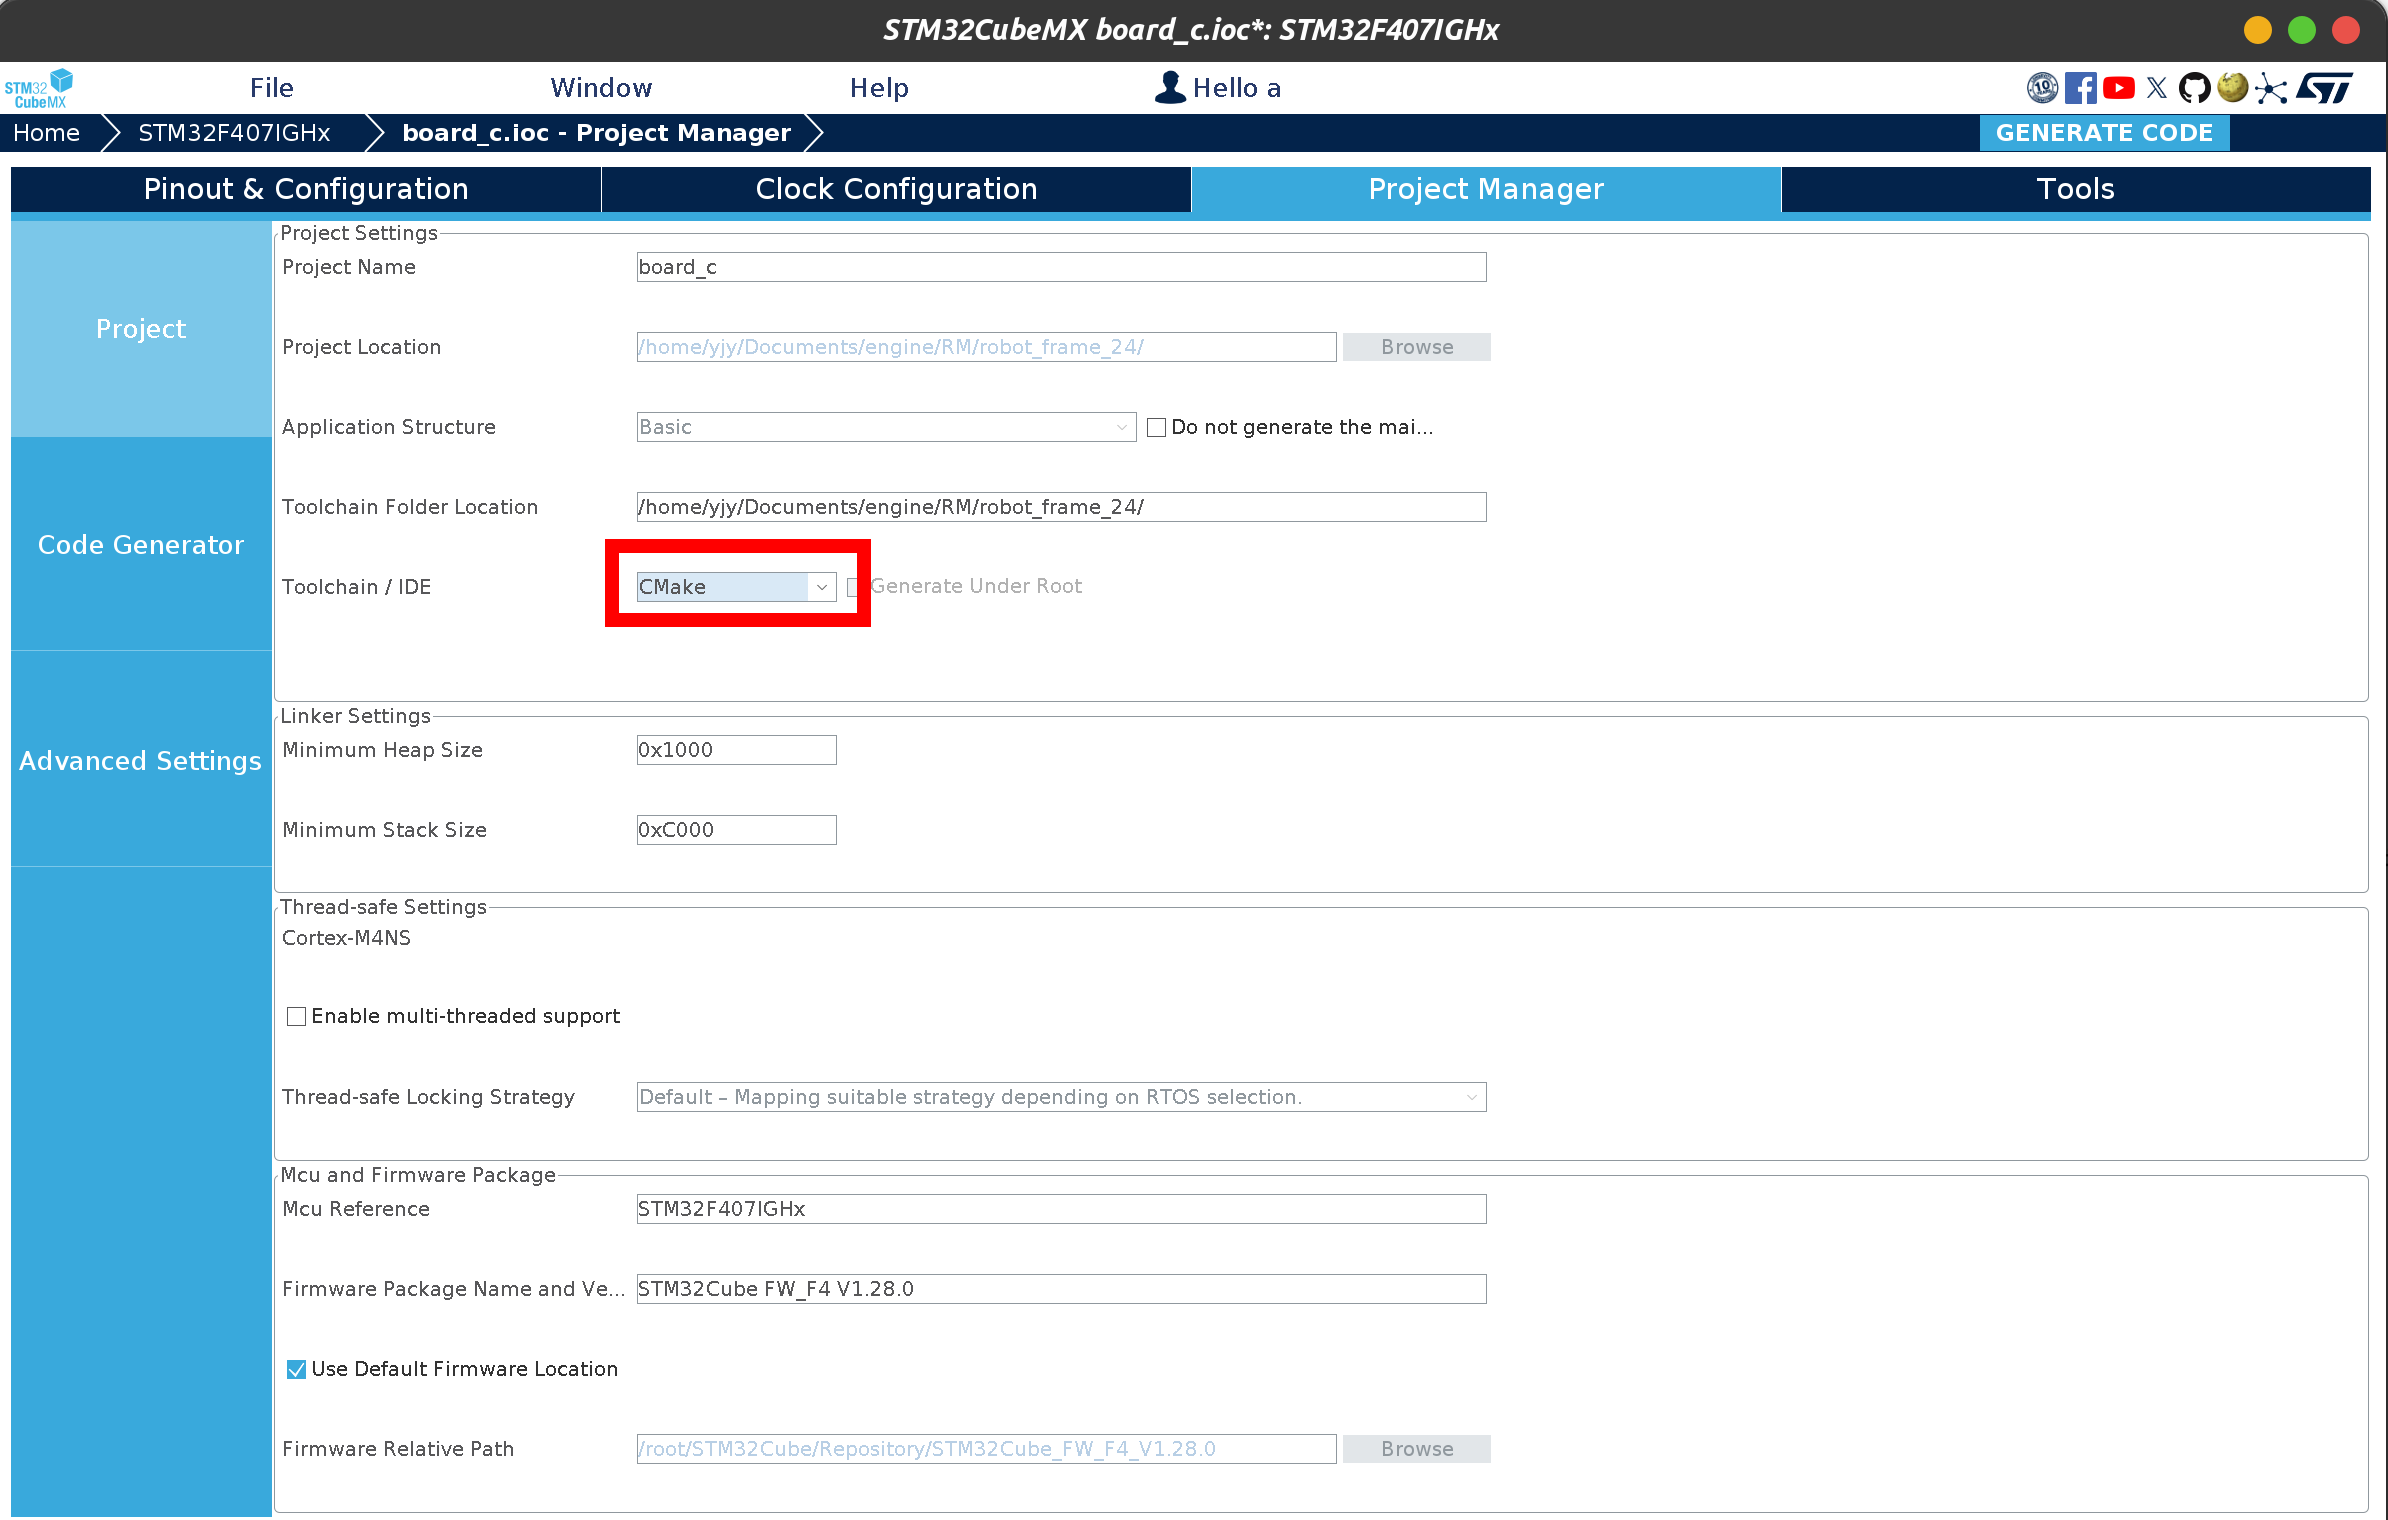
在 Toolchain IDE 中选择 cmake
need
cmake
ninga
arm-none-eabi-gcc

Arch
1 | pacman -S --needed arm-none-eabi-newlib |
修改 cmakelist
1 | add_compile_options(-w) |
生成 build. ninja
1 | cmake -B cmake-build-debug -G "Ninja" |
编译生成 .elf
1 | ninja -C build |
烧录
[[openocd]]
1 | openocd -f interface/cmsis-dap.cfg -f target/stm32f4x.cfg -c 'program ./cmake-build-debug/board_c.elf verify reset exit' |
调试
1 | openocd -f interface/cmsis-dap.cfg -f target/stm32f4x.cfg -c 'program ./cmake-build-debug/board_c.elf verify reset' -c 'init; reset init;' |
此后,启用调试有三种方法:
- 使用 telnet 连接 openocd, Telnet:默认运行在 4444 端口,Telnet 服务;
- 连接 tcl 服务器执行 tcl 脚本, TCL:默认运行在 6666 端口,TCL 脚本服务;
- 使用 gdb,连接远程目标到 openocd 的 gdbserver, GDB:默认运行在 3333 端口,GDB 调试服务;
STM32开发:1、使用VSCode + CMake + Ninja + CubeMX编译代码_cubemx cmake-CSDN博客
- Title: stm32 development environment on linux
- Author: yjy
- Created at : 2024-10-04 09:10:40
- Updated at : 2025-01-17 17:14:00
- Link: https://yjy.us.kg/linux_stm_dev/
- License: This work is licensed under CC BY-NC-SA 4.0.